
I know this girl, Rhonda, from one of my online groups. She amazing. She has a family of 7 ( all of her kids are in the teenage/early adult years and live at home). She says she has a nice size garden and she has meat in the freezer because they buy like 1/2 a cow and whole hogs and what not (I think she lives in the midwest...where they get to hunt and kill things). But she makes EVERYTHING from scratch and she feeds everyone on $250 a month. Seriously.... a family of SEVEN on $250 a month. And she has special diet restrictions (I think she has borderline diabetes or something) so don't go thinking they do processed stuff in their household. Everything is healthy and everything is made from scratch. She's insane amazing! :)
So today I stole her "Taco Soup" recipe. To be honest, it didn't look good at first, but I had almost everything I needed already, and I wanted to use it all up before I went shopping for the week. It turned out SOOOO good. Kind of like a Taco Salad, but instead of the lettuce part, it's a thick soup. Seriously....yum. I topped it with grated cheese, green onions and sour cream (oh and some Corn chip crumbles because we had them!). Then served cornbread on the side. It was a hit with everyone! Plus it made a ton. I'm going to try and freeze some of it. I'm sure it'll freeze really well!
I first browned some ground beef and onions in a big pot (you can use a dutch oven or whatever) and then drained it as much as I could. Then I followed the recipe below:
Taco soup from Rhonda's Homestyle Recipes
•1 28 oz. can diced tomatoes
•1 10 oz can Rotel tomatoes and diced chilies
•1 cup sweet corn kernels
•2 cans pinto beans (I cook my own from dry)
•1 pkt. taco seasoning (I mix my own)
•1 pkt. ranch dressing mix (I mix my own)
Mix all together, bring to a boil, then serve. OR you can cook it in your crock pot for 4 hours on low.
**To get the recipes to make your own Taco and Ranch dressing mix click HERE. Seriously, it's easy and so much healthier. Next time you're at the store, check out the ingredients in those pre-made seasoning packets. bleh..... You'll never go back to them once you start making your own!
Wednesday, February 16, 2011
Monday, February 7, 2011
Muffin Frittatas

It was my turn to bring some food for my Moms Connection group at church. It's a brunch and I was asked to bring an egg dish. This is always a little tough since 1) there's no possible way for the food to actually be hot by the time we eat it (and normally eggs are better when hot), and 2) since I already feel tight for time in the morning getting everyone ready to get out the door by 8:30ish...I really didn't want to wake up an hour earlier to make a fancy- dancy egg dish. I had to make (or at least be able to prep) something the night before. So I scoured the 'net and ran across these yummy frittatas. They were perfect! They tasted pretty good not-so-warm, I could easily customize them for different tastebuds and since they're already in individual servings, I didn't have to worry about any cutting or serving issues. I thought they were great. People had seconds....so I'm assuming they weren't terrible to the rest of my group too! :)
AND here's the kicker-- they taste GREAT warmed up. The author of the recipe says you can even freeze them!!! This makes them an AWESOME quick morning breakfast. I immediately thought of working moms with school-aged kids. You could just pop a couple of these in the microwave and serve with toast and fruit. Great nutritious breakfast and a cinch to serve up for families on the go! But hey, even though I stay at home, I won't pass up something quick and easy to serve in the morning. :)
Look at that -- you CAN have it all! :)
Muffin Frittatas
by American Egg Board
Ingredients
6 eggs
1/2 cup milk
1/4 teaspoon salt
1/8 teaspoon pepper
1 cup shredded Cheddar cheese
3/4 cup chopped zucchini
1/4 cup chopped red bell pepper
2 tablespoons chopped red onion
Directions
1.Heat oven to 350 degrees F. Beat eggs, milk, salt and pepper in medium bowl until blended. Add cheese, zucchini, bell pepper and onion; mix well. Spoon evenly into 12 greased muffin cups, about 1/4 cup each.
2.Bake in 350 degrees F oven until just set, 20 to 22 minutes. Cool on rack 5 minutes. Remove from cups; serve warm.
***TIPS***
1) When you whisk togeter the eggs and milk...make sure you whisk it good. You don't want any egg white clumps in there. You want it all to be combined nicely.
2) SPRAY THE PAN! Seriously, spray the heck out of the pan. If you have silcone muffin tins - use those (and still spray just in case).
3) I did a double batch of these and then added different veggies. One batch I did per the recipe and the other batch I did broccoli and carrots. Both were a hit. I even added in some Parm cheese I had, but be careful since the parm cheese is salty in and of itself....I thought they were a tad on the salty side. Next time if I do the parm cheese, I'll omit the salt that you would normally put in with the eggs.
Thursday, January 27, 2011
Carrot and Zucchini Crackers

Here's a great recipe for Carrot Crackers from my newest cooking website obsession, Weelicious. They're easy to make and super tasty. I make them with Weelicious's Veg-Wee Dip for dipping. I bought the Spike seasoning at Sprouts and use it for EVERYTHING! This is such a hit with the whole family!
Check out the video HERE
Carrot Snack Sticks (Makes about 30) --see Zucchini variation below
1 Cup All Purpose Flour
2 Tbsp Parmesan Cheese, grated
1/2 Tsp Baking Powder
1/2 Tsp Salt
1/2 Cup Carrot, finely shredded and thin
2 Tbsp Canola or Vegetable Oil
1. Preheat oven to 400 degrees.
2. Combine the first four ingredients and stir to combine.
3. Using your hands, add the carrots to the flour mixture coating the carrot pieces with flour.
4. Add the oil and work with your hands to bring the dough together.
(You really have to be patient with working this dough together so that the flour absorbs the oil. If you are concerned that it is not coming together, just add 1 extra tsp of oil to the dough and work it with your hands forming a ball until it comes together.)
5. Form the carrot Parmesan dough into a flat rectangular disk and allow to rest for 1-2 minutes then roll out 1/2 inch thick on parchment paper or a dry clean surface.
6. Using a knife, cut the dough into sticks, 2 inches long by 1/4 inch wide.
7. Bake on a Silpat or parchment lined cookie sheet for 15-17 minutes.
8. Cool and serve.
**Zucchini also tastes GREAT in this recipe. I actually like it a bit better than the carrots. I read the comments section on Weelicious for this recipe and found some other users use Zucchini and gave some great advice on how to properly prepare it. This is what I do:
1. Using the large holes on the cheese grater, I grate a large Zucchini
2 Toss about a tsp of salt with the Zucchini and let it sit in a strainer for about 30 minutes - pressing down occasionally
3. I press the zucchini between some paper towels after they get done draining Then use just as the carrots in the above recipe.
Wednesday, January 26, 2011
Salsa Chicken
These taste like chicken enchiladas without the tortilla. Actually - this would be great to make a double batch of, then shred and freeze half of it for quick tacos or enchildades later.
I also made my own Taco Seasoning - it's really easy and you probably have everything already in your spice section.
Taco Seasoning
Ingredients
1 tablespoon chili powder
1/4 teaspoon garlic powder
1/4 teaspoon onion powder
1/4 teaspoon crushed red pepper flakes
1/4 teaspoon dried oregano
1/2 teaspoon paprika
1 1/2 teaspoons ground cumin
1 teaspoon sea salt
1 teaspoon black pepper
Directions
1.In a small bowl, mix together chili powder, garlic powder, onion powder, red pepper flakes, oregano, paprika, cumin, salt and pepper. Store in an airtight container.
Salsa Chicken
**I didn't have chicken breasts so I used skinless, bone in thighs. They took about 10-15 minutes longer.
Ingredients
4 skinless, boneless chicken breast halves
4 teaspoons taco seasoning mix
1 cup salsa
1 cup shredded Cheddar cheese
2 tablespoons sour cream (optional)
Directions
1.Preheat oven to 375 degrees F (190 degrees C)
2.Place chicken breasts in a lightly greased 9x13 inch baking dish. Sprinkle taco seasoning on both sides of chicken breasts, and pour salsa over all.
3.Bake at 375 degrees F (190 degrees C) for 25 to 35 minutes, or until chicken is tender and juicy and its juices run clear.
4.Sprinkle chicken evenly with cheese, and continue baking for an additional 3 to 5 minutes, or until cheese is melted and bubbly. Top with sour cream if desired, and serve.
Wednesday, December 8, 2010
Fennel Applesauce
My new favorite web obsession is the Weelicious website. It has all kinds of awesome, kid-friendly and good-for-you recipes. LOVE IT!
I saw this recipe for Apple Fennel Puree and thought it was interesting. The kids love applesauce and eat it either by itself or on.....whatever. Most recently we've been putting it on waffles in the morning. Fennel is an awesome source of nutrition and has a licorice taste to it, so I thought that I'd give it a whirl. It came out great! It tastes like normal applesauce but with just a hint of that licorice at the end. It's not "sweet" though - so if you're use to eating sweeter applesauce, then you might want to add a little bit of sugar or something to it. I buy the kids natural applesauce - so they're pretty use to the not-as-sweet flavor. But just FYI that you might have to alter it a little bit to you liking. Also, you could up the apples to 3 instead of 2 ---that might help with the sweetness factor a little too!
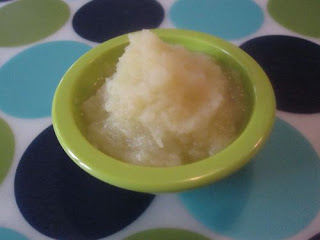 Photo courtesy of Weelicious
(Make 6 Baby Servings)
1 Fennel Bulb, fronds removed and fennel bulb (the white part) chopped
2 Apples, peeled, cored and chopped (I like to use Gala, Pink Lady or Fuji apples)
1. Place the fennel in a steamer pot over boiling water and cook for 4 minutes.
2. Add the apples to the pot and cook for an additional 3-4 minutes or until fennel and apples are fork tender.
3. Place the mixture in a food processor and puree.
4. Serve.
Pork Roast in Rich Red Wine Sauce
My goodness, this was so good. Seriously.......yum.

Pork Roast in Rich Red Wine Sauce
---------------------------------------------
After I seared the meat, I sliced up an onion and browned it, then I added the other ingredients. I did not have any peppercorns, so I omitted those (although I did add some normal pepper). The sauce is SO good. Seriously, I'm trying to think of other things to put it on just so I can make sure every last drop gets eaten.
Just FYI -- I bought a 5lb roast and just used it for Darrin and myself. Then, I'm using the leftovers for 2 different meals. Leftover meal #1 is going to be pulled pork BBQ sandwiches and Leftover Meal #2 is going to be 7-Bean and Barley soup (using the bone from the roast and then throwing in whatever meat I have leftover). So don't let the "feeds 8" thing scare you off! :)

Pork Roast in Rich Red Wine Sauce
Ingredients --Serves 8
3 tablespoons canola oil
5 pounds boneless pork loin roast, tied (***I did not have it tied)
3 cloves garlic, minced
1/4 cup parsley, chopped
4 cups Cabernet Sauvignon wine (***Yup....that's an entire bottle!)
1/2 teaspoon salt
1 teaspoon peppercorns
2 tablespoons butter
2 tablespoons flour
5 pounds boneless pork loin roast, tied (***I did not have it tied)
3 cloves garlic, minced
1/4 cup parsley, chopped
4 cups Cabernet Sauvignon wine (***Yup....that's an entire bottle!)
1/2 teaspoon salt
1 teaspoon peppercorns
2 tablespoons butter
2 tablespoons flour
Methods/steps
Heat oil in dutch oven over medium-high heat. Sear the meat in oil to brown on all sides.
Add garlic, parsley, wine, salt and peppercorns. Reduce heat and simmer covered for 3 hours.
Remove meat and reduce stock to 1/3 of it's volume. Strain the sauce to remove the peppercorns.
Heat butter in a smaller saucepan. Add flour and cook 3 minutes, pour in the stock, and simmer to thicken.
Carve the pork and serve with sauce separately.
---------------------------------------------
After I seared the meat, I sliced up an onion and browned it, then I added the other ingredients. I did not have any peppercorns, so I omitted those (although I did add some normal pepper). The sauce is SO good. Seriously, I'm trying to think of other things to put it on just so I can make sure every last drop gets eaten.
Just FYI -- I bought a 5lb roast and just used it for Darrin and myself. Then, I'm using the leftovers for 2 different meals. Leftover meal #1 is going to be pulled pork BBQ sandwiches and Leftover Meal #2 is going to be 7-Bean and Barley soup (using the bone from the roast and then throwing in whatever meat I have leftover). So don't let the "feeds 8" thing scare you off! :)
Garlicky Clams and Mussels
Clams and Mussels went on sale at Henrys, and knowing how much Darrin LOVES clams and mussles, I thought I'd grab some and make a yummy dish out of them! **Quick Rant --- I asked the seafood guy to give me 2 lbs of Clams (since they were big) and 1 lb of mussels (I cut the recipe in half). When I got home, I realized that over HALF of the mussels I was given were already open meaning that they were unusable. I could only use 19 out of my 40 mussels. I was NOT a happy camper. Note to self - from now on, when wanting mussels, go to a real fish monger where I can pick and choose the items I want. OK...rant over. **
Anywho - here's the pasta recipe that I used. It was DELICIOUS! I was licking up the bowl!
Anywho - here's the pasta recipe that I used. It was DELICIOUS! I was licking up the bowl!
Garlicky Clams and Mussels Recipe courtesy of Emeril Lagasse
Ingredients
- 3 tablespoons olive oil
- 2 whole garlic cloves, peeled
- 2 pounds mussels, scrubbed and debearded
- 2 pounds baby clams (littleneck if available), scrubbed
- 1 stick of butter, cut into tablespoons
- 2 tablespoons minced garlic, in all
- Salt and pepper
- 1 pounds fresh angel hair pasta
- 1 cup grated Parmigiano-Reggiano cheese
- 1/2 cup finely chopped parsley
Directions
Bring a pot of salted water up to a boil. In a large saute pan, heat the olive oil and the garlic cloves. When the garlic starts to turn golden discard the cloves, about 2 minutes. Add the mussels and clams to the oil. Cover the pan and saute the seafood for about 3 to 4 minutes, shaking the pan occasionally, or until the shells open. Remove the pan from the heat and discard any shells that did not open. Pour the seafood into a bowl and set aside. Place the saute pan back on the heat and melt the butter with the minced garlic, over medium-low heat, about 2 minutes. Drop the pasta in the boiling water and cook until the pasta is al dente, about 2 to 3 minutes. Add the Sauteed mussels and clams with their liquid back into the pan. Saute for 1 minute. Remove the pasta from the water and drain. Place the pasta directly into the saute pan. Remove from the heat and toss the pasta with the mussels and clams. Season with salt and pepper. Mound the pasta in the center of an over-sized pasta bowl. Garnish with the grated cheese and chopped parsley
Subscribe to:
Comments (Atom)


Additional Tips
You can use a smaller piece of pork for fewer servings, but leave the sauce recipe alone - the extra sauce helps permeate the meat with it's rich flavor.